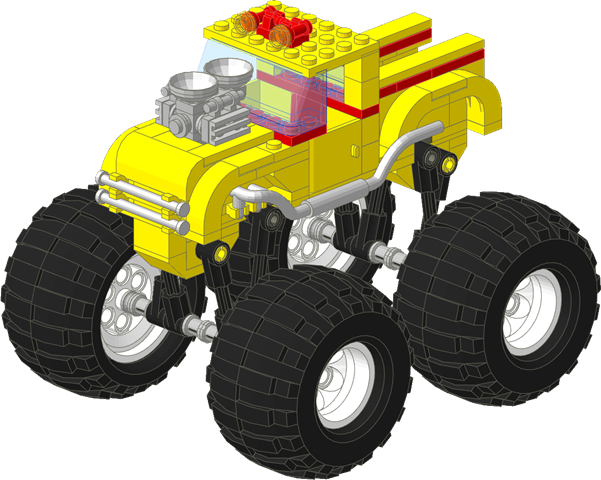
<?xml version="1.0" encoding="UTF-8"?>
<rss version="2.0"
	xmlns:content="http://purl.org/rss/1.0/modules/content/"
	xmlns:wfw="http://wellformedweb.org/CommentAPI/"
	xmlns:dc="http://purl.org/dc/elements/1.1/"
	xmlns:atom="http://www.w3.org/2005/Atom"
	xmlns:sy="http://purl.org/rss/1.0/modules/syndication/"
	xmlns:slash="http://purl.org/rss/1.0/modules/slash/"
	>

<channel>
	<title>Mike Walsh&#039;s LEGOÂ® Blog &#187; Instructions</title>
	<atom:link href="http://www.carolinatrainbuilders.com/index.php/category/instructions/feed/" rel="self" type="application/rss+xml" />
	<link>http://www.carolinatrainbuilders.com</link>
	<description>Thoughts and musings on all things LEGOÂ®</description>
	<lastBuildDate>Fri, 09 Jul 2010 16:32:49 +0000</lastBuildDate>
	<generator>http://wordpress.org/?v=2.9.2</generator>
	<language>en</language>
	<sy:updatePeriod>hourly</sy:updatePeriod>
	<sy:updateFrequency>1</sy:updateFrequency>
			<item>
		<title>Converting the Emerald Night to 9v</title>
		<link>http://www.carolinatrainbuilders.com/index.php/2010/01/converting-the-emerald-night-to-9v/</link>
		<comments>http://www.carolinatrainbuilders.com/index.php/2010/01/converting-the-emerald-night-to-9v/#comments</comments>
		<pubDate>Tue, 26 Jan 2010 15:44:16 +0000</pubDate>
		<dc:creator>Mike Walsh</dc:creator>
				<category><![CDATA[CAD]]></category>
		<category><![CDATA[Instructions]]></category>
		<category><![CDATA[LEGOPalooza]]></category>
		<category><![CDATA[LUGNET]]></category>
		<category><![CDATA[NCLUG]]></category>

		<guid isPermaLink="false">http://www.carolinatrainbuilders.com/?p=442</guid>
		<description><![CDATA[I built the Emerald Night a while ago and it has sat in the box down in my basement ever since.Â  It is a beautiful train although it really does need additional passenger cars.Â  A month ago when I had the e-mail dialog with my Dad about the Emerald Night, he asked me how it [...]]]></description>
			<content:encoded><![CDATA[<p><a href="http://www.carolinatrainbuilders.com/wp-content/uploads/2010/01/tender_6_rearwheels_1_0_0_0_1_0_0_0_1_4_1650_150_DPI_1.png"><img style="float:right;" class="alignright size-medium wp-image-444" title="tender_6_rearwheels_1_0_0_0_1_0_0_0_1_4_1650_150_DPI_1" src="http://www.carolinatrainbuilders.com/wp-content/uploads/2010/01/tender_6_rearwheels_1_0_0_0_1_0_0_0_1_4_1650_150_DPI_1-300x199.png" alt="" width="300" height="199" /></a>I built the Emerald Night a while ago and it has sat in the box down in my basement ever since.Â  It is a beautiful train although it really does need additional passenger cars.Â  A month ago when I had the e-mail dialog with my Dad about the Emerald Night, he asked me how it be converted to use a 9v motor (since he has several of them).Â  I know the Emerald Night comes with instructions on how to add a Power Function motor but (a) neither of us have the right motor and (b) neither of us feel like buying more motors when we already have 9v motors on hand.</p>
<p>I thought about it a bit and decided trying to stuff a 9v motor in the locomotive was a fools errand.Â  However, adding one to the tender looked pretty straight forward.Â  I decided to poke around a bit and there is <a href="http://news.lugnet.com/trains/?n=31002&amp;t=f&amp;v=a">thread on LUGNET</a> and a number of blog posts that describe various solutions to the problem.Â  The LUGNET thread in particular is pretty involved and uses a gutted 9v motor along with Power Functions.Â  A bit more than I am willing to take on right now although I do have several dead 9v motors.Â  From further searching it appears there are a number of solutions depending on how close you want it the train to look compared to standard instrcutions.Â  I am not too picky, I just want it work and not look awkward.</p>
<p>There was an <a href="http://www.nclug.us">NCLUG</a> meeting this past Sunday afternoon and I decided to take a loop of 9v track and the Emerald Night along with some parts with me to see if I could make it run.Â  The key to my idea was to add a single wheel set and a 9v motor to the tender.Â  Doing this meant tweaking the chassis design of the tender a bit to account for the pin on the 9v motor.Â  The modification is pretty simple and makes use of some standard size black plates.Â Â  I have documented the changes to the tender chassis and produced instructions using Lpub.Â  The instructions for the tender are not complete &#8211; they just replace steps 1-5 and eliminate steps 16-18 in the <a href="http://cache.lego.com/bigdownloads/buildinginstructions/4581168.pdf">official instructions</a>.</p>
<p><img style="float:left;" class="alignleft size-medium wp-image-443" title="tender_1_0_0_0_1_0_0_0_1_6_1650_150_DPI_1" src="http://www.carolinatrainbuilders.com/wp-content/uploads/2010/01/tender_1_0_0_0_1_0_0_0_1_6_1650_150_DPI_1-300x166.png" alt="Emerald Night 9v Tender Chassis" width="300" height="166" />So does it work?Â  Sort of.Â  I say sort of because the modifications to the tender work fine however the tender struggles to push the locomotive through the curves on the small loop.Â  I think this is due to the large train wheels on the locomotive which are linked together via Technic axels to bind up.</p>
<p>Unfortunately I didn&#8217;t have any parts with me that I could use to swap out the axels for simple pins which I hope will solve the problem.Â  I hope to try this in the next day or two as I want to run the Emerald Night at LEGOPalooza.</p>
<h2>Instructions</h2>
<table>
<tbody>
<tr>
<td valign="top"><img class="aligncenter size-full wp-image-386" title="pdf" src="http://www.carolinatrainbuilders.com/wp-content/uploads/2010/01/pdf.gif" alt="" width="31" height="34" /></td>
<td><a href="http://www.carolinatrainbuilders.com/wp-content/plugins/download-monitor/download.php?id=18" title="9v 10194 Tender has been downloaded 357 times" >9v 10194 Tender</a> <br />2010-01-25 - downloaded 357 times<br />My take on converting the 10194 to 9v by motorizing the tender.</td>
</tr>
</tbody>
</table>
]]></content:encoded>
			<wfw:commentRss>http://www.carolinatrainbuilders.com/index.php/2010/01/converting-the-emerald-night-to-9v/feed/</wfw:commentRss>
		<slash:comments>15</slash:comments>
		</item>
		<item>
		<title>CTB-6500 Instructions Available</title>
		<link>http://www.carolinatrainbuilders.com/index.php/2009/01/ctb-6500-instructions-available/</link>
		<comments>http://www.carolinatrainbuilders.com/index.php/2009/01/ctb-6500-instructions-available/#comments</comments>
		<pubDate>Thu, 01 Jan 2009 15:22:35 +0000</pubDate>
		<dc:creator>Mike Walsh</dc:creator>
				<category><![CDATA[Custom Kits]]></category>
		<category><![CDATA[Instructions]]></category>
		<category><![CDATA[MOC]]></category>

		<guid isPermaLink="false">http://blog.carolinatrainbuilders.com/?p=171</guid>
		<description><![CDATA[ 
I finally tracked down the LDraw part I was missing to properly generate the instructions for my CTB-6500 Yellow Monster Truck.&#160; The instructions are now available for download as a PDF file (6.67MB).&#160; Enjoy!
This is my first set of instructions done with LPub4 which greatly simplifies the process of documenting a model.&#160; The cover [...]]]></description>
			<content:encoded><![CDATA[<p align="center"><a href="http://blog.carolinatrainbuilders.com/wp-content/uploads/2008/12/ctb-6500.pdf"><img src="http://blog.carolinatrainbuilders.com/wp-content/uploads/2008/11/ctb-6500-cover-thumb.png"></a> </p>
<p>I finally tracked down the LDraw part I was missing to properly generate the instructions for my CTB-6500 Yellow Monster Truck.&nbsp; The instructions are now <a href="http://blog.carolinatrainbuilders.com/wp-content/uploads/2008/12/ctb-6500.pdf">available for download</a> as a PDF file (6.67MB).&nbsp; Enjoy!</p>
<p>This is my first set of instructions done with <a href="http://www.kclague.net/LPub4.htm">LPub4</a> which greatly simplifies the process of documenting a model.&nbsp; The cover image was generated with <a href="http://www.povray.org">POV-Ray</a>.&nbsp; I hope to have several more models available in the near future.</p>
]]></content:encoded>
			<wfw:commentRss>http://www.carolinatrainbuilders.com/index.php/2009/01/ctb-6500-instructions-available/feed/</wfw:commentRss>
		<slash:comments>0</slash:comments>
		</item>
		<item>
		<title>NXT Robot solves Rubik&#8217;s cube</title>
		<link>http://www.carolinatrainbuilders.com/index.php/2008/12/nxt-robot-solves-rubiks-cube/</link>
		<comments>http://www.carolinatrainbuilders.com/index.php/2008/12/nxt-robot-solves-rubiks-cube/#comments</comments>
		<pubDate>Sat, 06 Dec 2008 11:39:08 +0000</pubDate>
		<dc:creator>Mike Walsh</dc:creator>
				<category><![CDATA[Caught My Eye]]></category>
		<category><![CDATA[Instructions]]></category>
		<category><![CDATA[Odd and Ends]]></category>

		<guid isPermaLink="false">http://blog.carolinatrainbuilders.com/?p=157</guid>
		<description><![CDATA[Every once in a while you stumble across something that is just really cool.&#160; This morning I was reading the Good Morning Silicon Valley newsletter and in the Off Topic section it had a link to a a Lego MindStorms robot that solves Rubik’s cube.&#160; Well I just had to check that out.
 
Check out [...]]]></description>
			<content:encoded><![CDATA[<p>Every once in a while you stumble across something that is just really cool.&nbsp; This morning I was reading the <a href="http://blogs.siliconvalley.com/gmsv/">Good Morning Silicon Valley</a> newsletter and in the Off Topic section it had a link to a <a title="a Lego Mindstorms robot that solves Rubik&rsquo;s cube" href="http://www.tiltedtwister.com/">a Lego MindStorms robot that solves Rubik’s cube</a>.&nbsp; Well I just had to check that out.</p>
<p><img height="597" src="http://www.tiltedtwister.com/images/tiltedtwister/tiltedtwister.jpg" width="500"> </p>
<p>Check out the <a href="http://www.tiltedtwister.com">Tilted Twister</a> web site and make sure to watch the video.&nbsp; If you have ever puzzled over Rubik&#8217;s cube, this will really fascinate you.&nbsp; There are instruction available if you want to build your own.</p>
]]></content:encoded>
			<wfw:commentRss>http://www.carolinatrainbuilders.com/index.php/2008/12/nxt-robot-solves-rubiks-cube/feed/</wfw:commentRss>
		<slash:comments>0</slash:comments>
		</item>
		<item>
		<title>First Results from LPub4 &#8211; CTB-6500</title>
		<link>http://www.carolinatrainbuilders.com/index.php/2008/11/first-results-from-lpub4-ctb-6500/</link>
		<comments>http://www.carolinatrainbuilders.com/index.php/2008/11/first-results-from-lpub4-ctb-6500/#comments</comments>
		<pubDate>Sun, 30 Nov 2008 19:50:49 +0000</pubDate>
		<dc:creator>Mike Walsh</dc:creator>
				<category><![CDATA[CAD]]></category>
		<category><![CDATA[Custom Kits]]></category>
		<category><![CDATA[Instructions]]></category>
		<category><![CDATA[MOC]]></category>

		<guid isPermaLink="false">http://blog.carolinatrainbuilders.com/?p=156</guid>
		<description><![CDATA[For the past day or so I have been playing with LPub4 here and there.&#160; I am happy to post the first results of my efforts.&#160; I can only say &#8220;wow&#8221; &#8211; Kevin Clague is the man!&#160; I never thought I would see the day where we would have WYSIWYG creation LEGO instructions but that [...]]]></description>
			<content:encoded><![CDATA[<p>For the past day or so I have been playing with <a href="http://www.kclague.net/LPub4.htm">LPub4</a> here and there.&nbsp; I am happy to post the first results of my efforts.&nbsp; I can only say &#8220;wow&#8221; &#8211; <a href="http://www.kclague.net">Kevin Clague</a> is the man!&nbsp; I never thought I would see the day where we would have WYSIWYG creation LEGO instructions but that is what you get with LPub4.</p>
<p>I have very few complaints &#8211; what Kevin has done is simply amazing.&nbsp; If you have ever been interested in creating your own instructions but have shied away because of the complexity of the process, you should give <a href="http://www.kclague.net/LPub4.htm">LPub</a> a look!</p>
<p>CTB-6500 is a Monster Truck I built years ago which I have used for NCLTC layouts.&nbsp; It is one of my favorite trucks and at one time I had visions of offering it as a kit.&nbsp; Somewhere in the bowels of my basement I have a stash of the large tires which came from the <a href="http://www.brickset.com/detail.aspx?Set=5561-1">Model Team 5561 Big Foot 4&#215;4</a>.</p>
<p>This entire set of instructions was created with LPub4 except the cover which was done with L3PAO, L3P, and POV-Ray.</p>
<p><a href="http://blog.carolinatrainbuilders.com/wp-content/uploads/2008/11/ctb-6500-cover.png"><img style="border-right: 0px; border-top: 0px; border-left: 0px; border-bottom: 0px" height="326" alt="CTB-6500_Cover" src="http://blog.carolinatrainbuilders.com/wp-content/uploads/2008/11/ctb-6500-cover-thumb.png" width="432" border="0"></a> </p>
<p>A PDF version of the instructions will be available soon.</p>
]]></content:encoded>
			<wfw:commentRss>http://www.carolinatrainbuilders.com/index.php/2008/11/first-results-from-lpub4-ctb-6500/feed/</wfw:commentRss>
		<slash:comments>0</slash:comments>
		</item>
		<item>
		<title>LPub 4 &#8211; Wow!</title>
		<link>http://www.carolinatrainbuilders.com/index.php/2008/11/lpub-4-wow/</link>
		<comments>http://www.carolinatrainbuilders.com/index.php/2008/11/lpub-4-wow/#comments</comments>
		<pubDate>Sat, 29 Nov 2008 15:10:38 +0000</pubDate>
		<dc:creator>Mike Walsh</dc:creator>
				<category><![CDATA[CAD]]></category>
		<category><![CDATA[Instructions]]></category>
		<category><![CDATA[MOC]]></category>

		<guid isPermaLink="false">http://blog.carolinatrainbuilders.com/?p=150</guid>
		<description><![CDATA[It has been a while since I have done much LEGO CAD work.&#160; After doing it almost every day during the LEGO Hobby Train project, I got a bit burned out on it too.&#160; Taking a model and turning it into good quality instructions was an incredibly time consuming process and one of the primary [...]]]></description>
			<content:encoded><![CDATA[<p>It has been a while since I have done much LEGO CAD work.&nbsp; After doing it almost every day during the LEGO Hobby Train project, I got a bit burned out on it too.&nbsp; Taking a model and turning it into good quality instructions was an incredibly time consuming process and one of the primary reasons I stopped doing kits.</p>
<p>When Kevin Clague first released LPub I was hopeful that it would make the instruction process easier and it did but at the same time, it posed a different set of challenges.&nbsp; I could never quite get it working to the point I was happy with it and instead remained with my manual process of batch scripting LDLite.</p>
<p>Recently one of my co-workers has gotten involved with a FIRST LEGO League (FLL) team and wanted to do some CAD work.&nbsp; I was able to get him up and running and in the process, decided I ought to get myself tooled up again.</p>
<p>I have a pretty elaborate VMware configuration I use for some things at work which works really well to create an isolated environment.&nbsp; I created a LEGO CAD VM from my solid XP base and installed all of the relevant LEGO CAD tools including the latest version of <a href="http://www.kclague.net/LPub4.htm">LPub</a>.&nbsp; All I can say is wow.&nbsp; The default instructions are usable although if you have a lot of callouts, which I tend to have, it will generate a lot of pages.&nbsp; So now I have some learning to do but the initial results are so favorable, that I don&#8217;t mind spending some cycles on it.</p>
<p>My first project will be this Monster Truck which I built a while ago and had started capturing in ML-CAD but never finished.&nbsp; I finished capturing it this morning and was able to render this image.</p>
<p><a href="http://blog.carolinatrainbuilders.com/wp-content/uploads/2008/11/ctb-65001.png"><img style="border-top-width: 0px; border-left-width: 0px; border-bottom-width: 0px; border-right-width: 0px" height="399" alt="CTB-6500" src="http://blog.carolinatrainbuilders.com/wp-content/uploads/2008/11/ctb-6500-thumb1.png" width="500" border="0"></a></p>
]]></content:encoded>
			<wfw:commentRss>http://www.carolinatrainbuilders.com/index.php/2008/11/lpub-4-wow/feed/</wfw:commentRss>
		<slash:comments>0</slash:comments>
		</item>
	</channel>
</rss>
